
Konfiguracja klienta VPN – Windows 8


Przykłady konfiguracji połaczenia VPN dla systemu Windows 8
Sugerujemy użycie protokołu L2TP/IPsec dla najlepszej wydajności
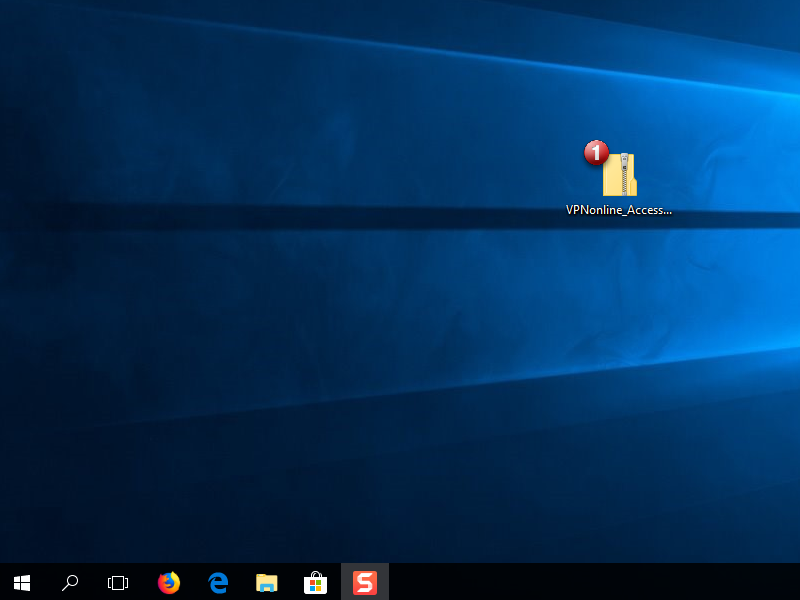
Pobierz aplikację z naszej strony VPNonline Access i rozpakuj (1)
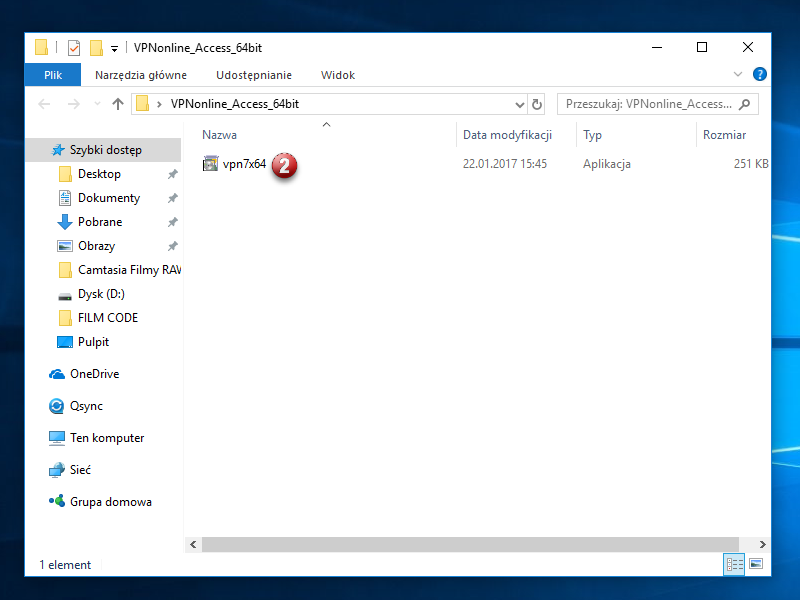
Po pobraniu aplikacji, klikamy na nią i instalujemy (2)
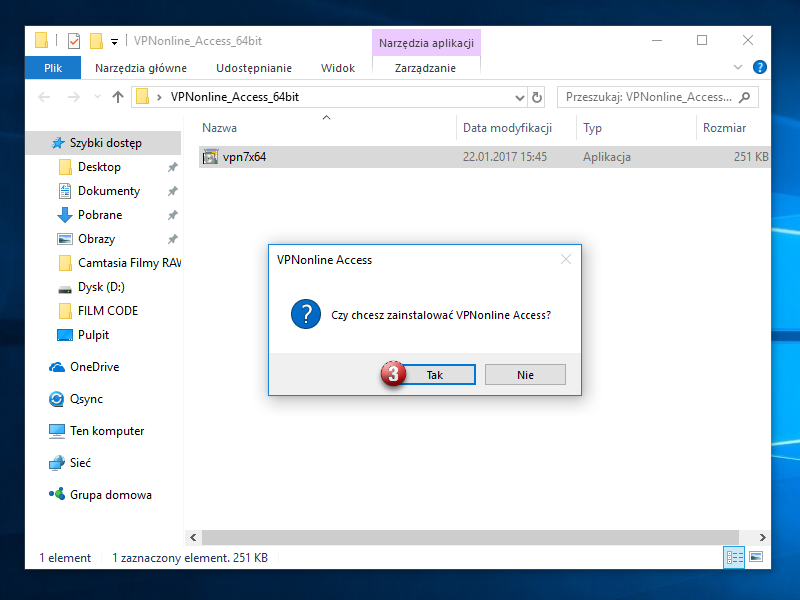
Potwierdź instalację aplikacji klikając "TAK" (3)
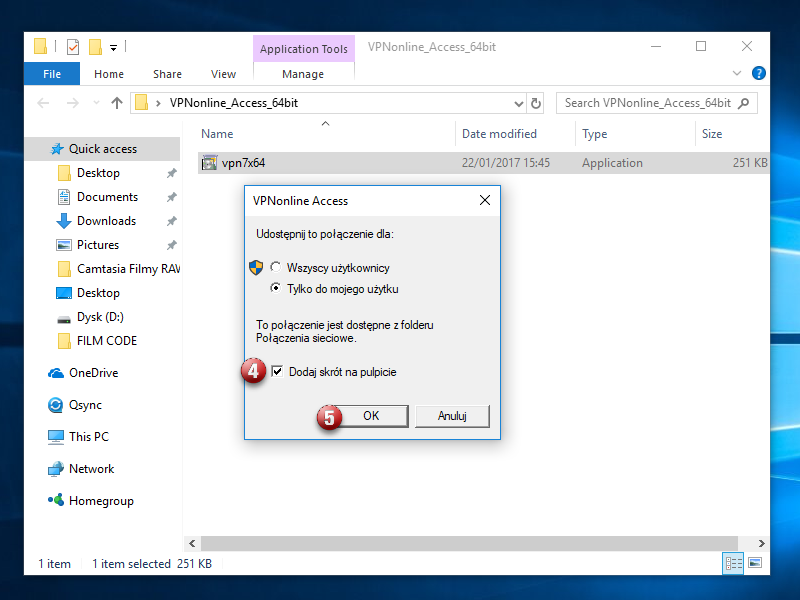
Zaznacz "Dodaj skrót na pulpicie" (4) i kliknij "OK" (5)
Po instalacji, aplikacji automatycznie zostanie otwarta. Na pulpicie pokazał się nowy skrót do aplikacji.
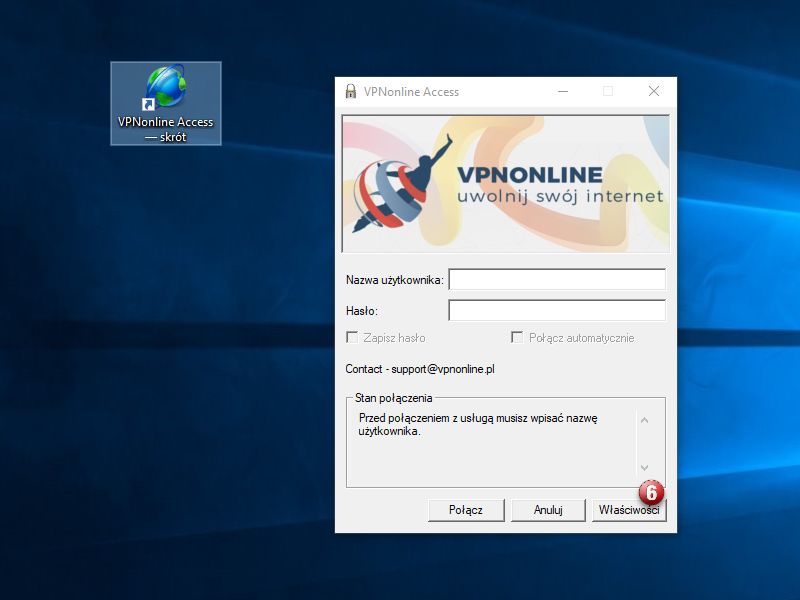
W aplikacji, kliknij przycisk "Właściwości" (6)
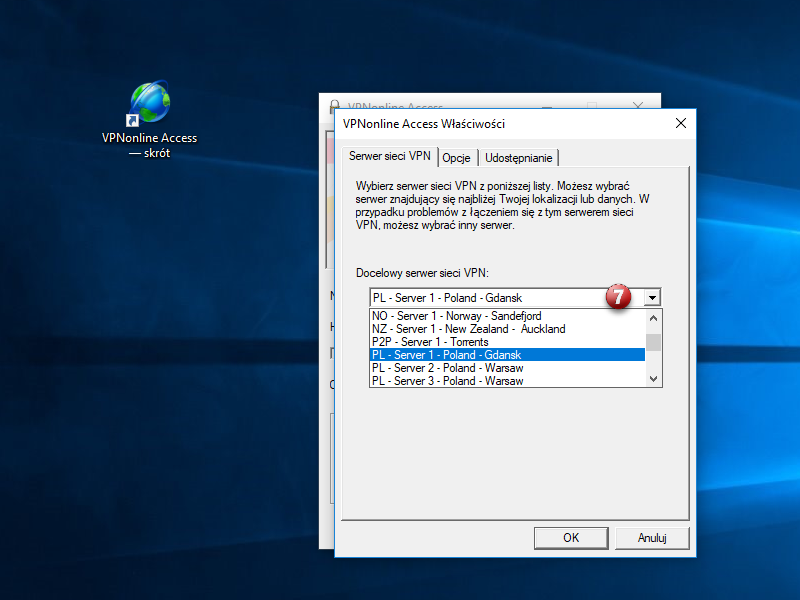
Z rozwijanej listy, wybierz serwer VPN do którego chcesz się połaczyć (7) i kliknij OK
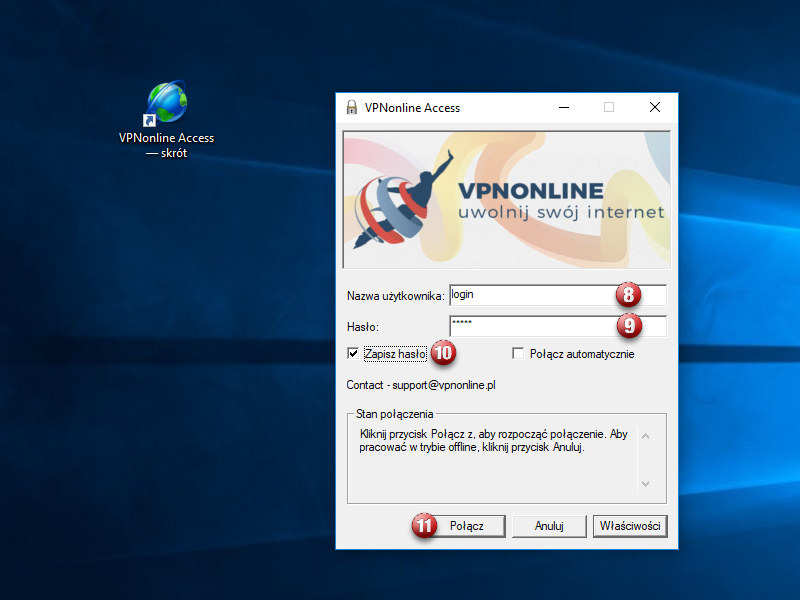
Wpisz swój login (8) i hasło (9) oraz zaznacz pole "Zapamiętaj hasło" (10).
Następnie kliknij "Połącz" (11)
W pierwszym kroku kliknij prawym przyciskiem myszki na przycisk "START" (1) i następnie przejdź do "Panelu Sterowania" (2)

W Panelu Sterowania wybierz "Wyświetl stan sieci i zadania" (3)

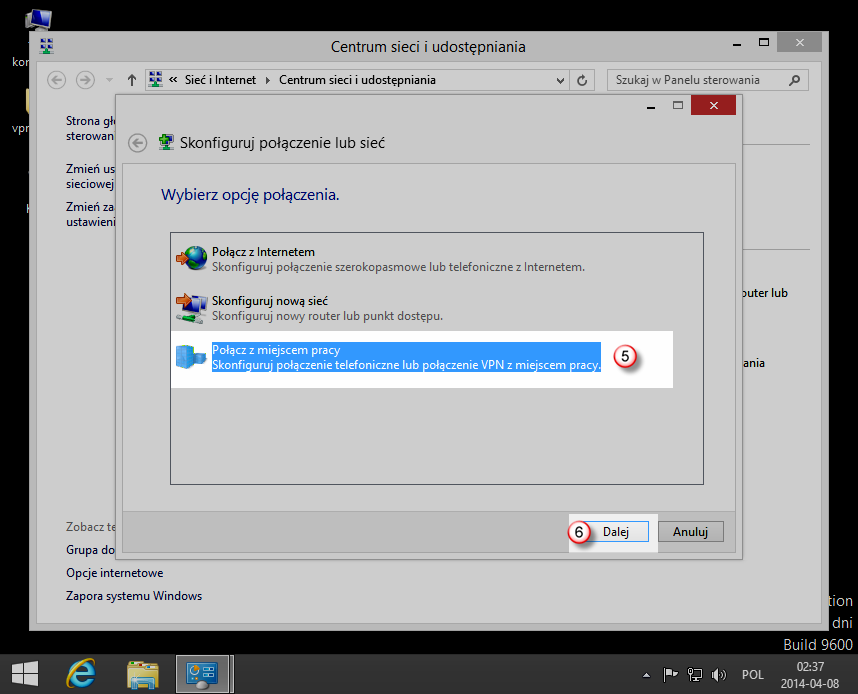
Następnie wybierz "Skonfiguruj nowe połączenie lub nowa sieć" (4)

Wybierz, "Połącz z miejscem pracy" (5) i kliknij "Dalej" (6)

Wybierz, "Użyj mojego połączenia internetowego (VPN)" (7)

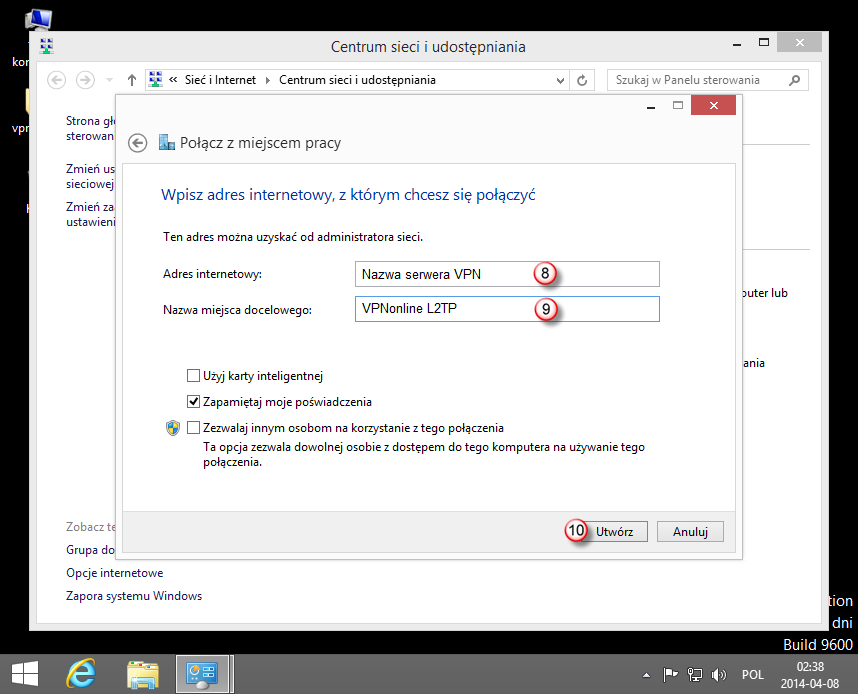
W polu: "Adres internetowy" (8) - wpisz nazwę jednego z serwerów VPNonline
W polu: "Nazwa miejsca docelowego" (9) - wpisz nazwę połączenia np. VPNonline L2TP
Po wprowadzeniu wymaganych danych, kliknij "Utwórz" (10)
Listę dostępnych serwerów VPN znajdziesz w panelu klienta: https://portal.vpnonline.pl
Wróć do okna "Centrum sieci i udostępniania" i wybierz "Zmień ustawienia karty sieciowej" (11)

Zaznacz nowo utworzone połączenie "VPNonline L2TP" (12) i kliknij na nim prawym przyciskiem myszy.
Z rozwijanego menu wybierz :"Właściwości" (13)

W oknie "Właściwości: VPNonline L2TP" wybierz zakładkę "Zabezpieczenia" (14)

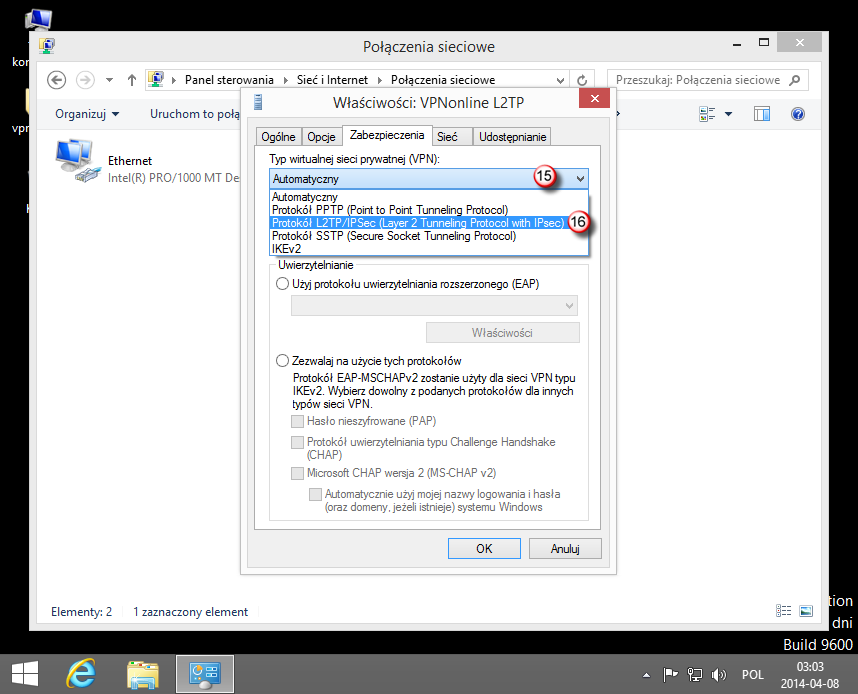
Z rozwijanej listy "Typ wirtualnej sieci prywatnej (VPN)" (15) wybierz:
"Protokół L2TP/IPsec ( Layer 2 Tunneling Protocol with IPsec)" (16)
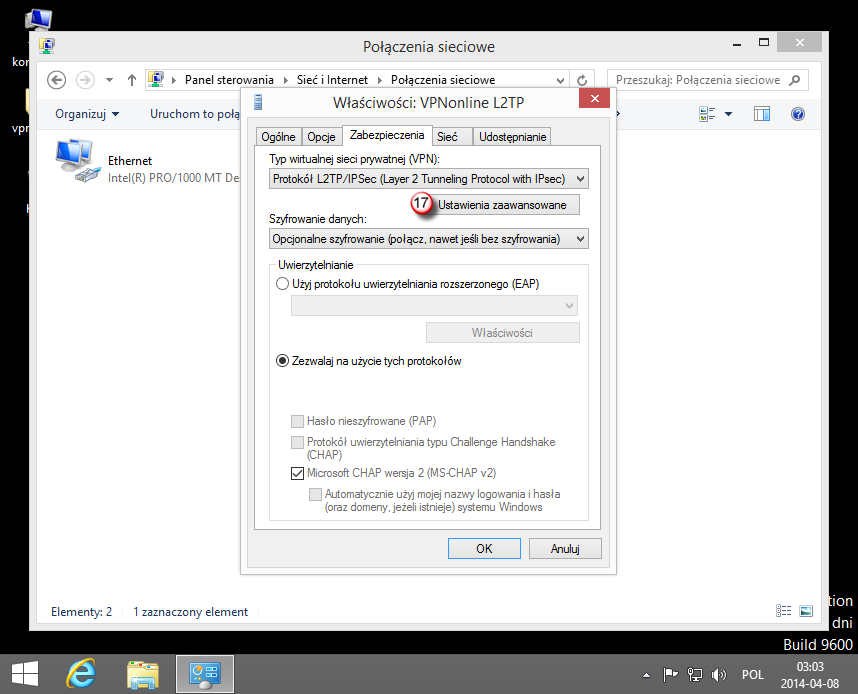
Następnie kliknij na "Ustawienia zaawansowane" (17)
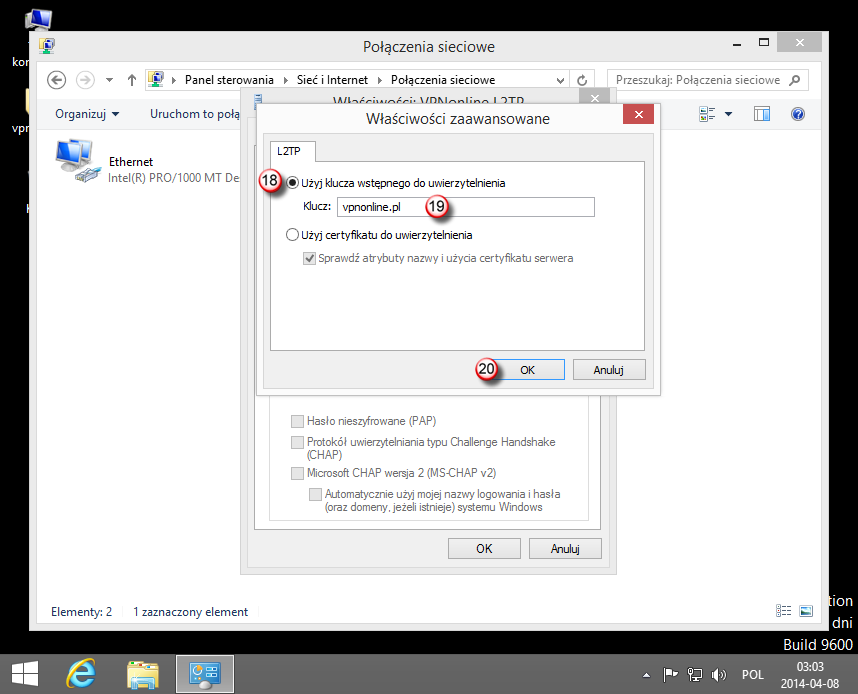
Wybierz "Użyj klucza wstępnego do uwierzytelniania" (18)
W polu "Klucz" (19) wpisz: vpnonline.pl
Kliknij "OK" (20)
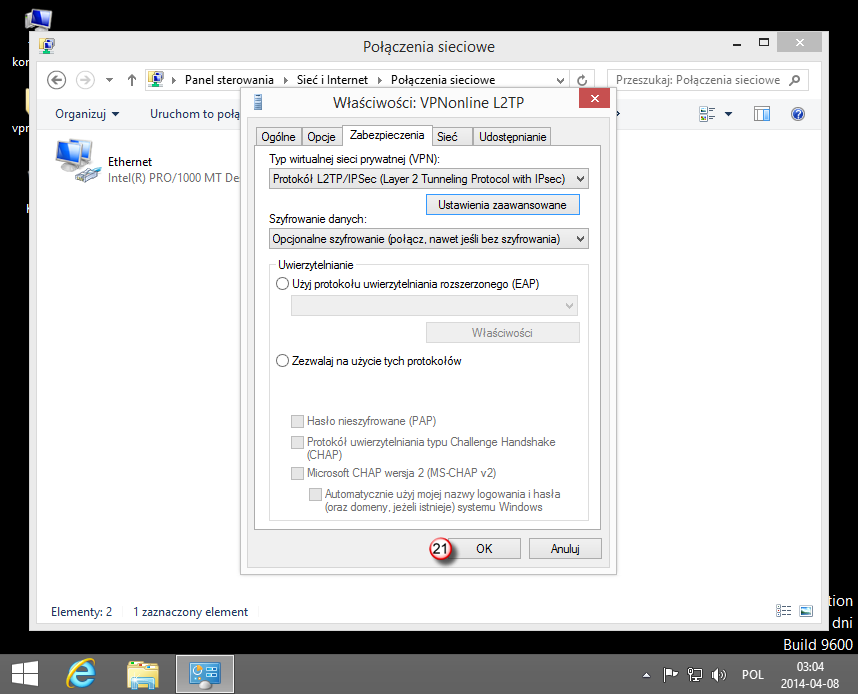
Kliknij "OK" (21)
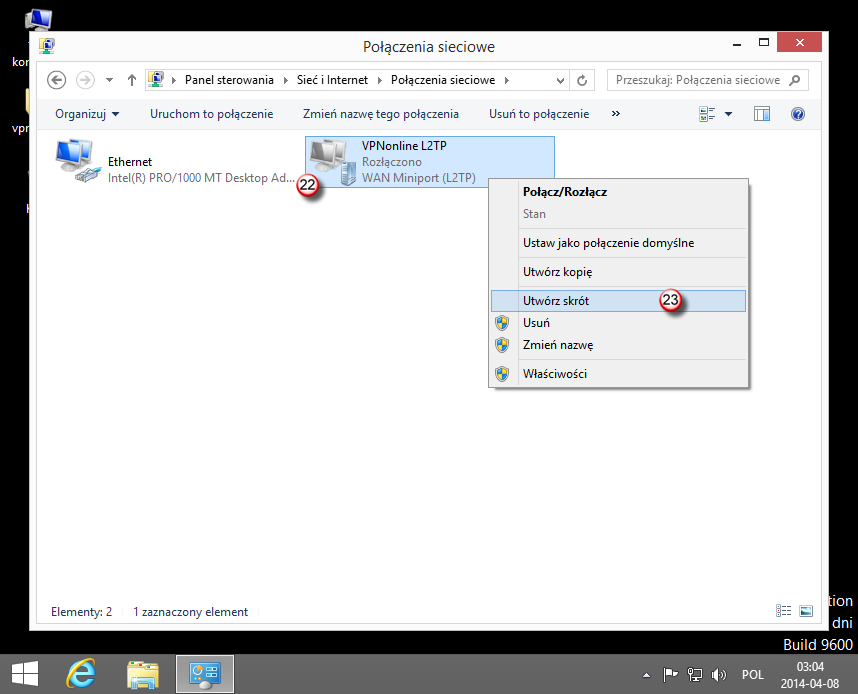
Zaznacz ponownie połączenie "VPNonline L2TP" (22) i kliknij na nim prawym przyciskiem myszki.
Z rozwijanego menu wybierz "Utwórz skrót" (23)
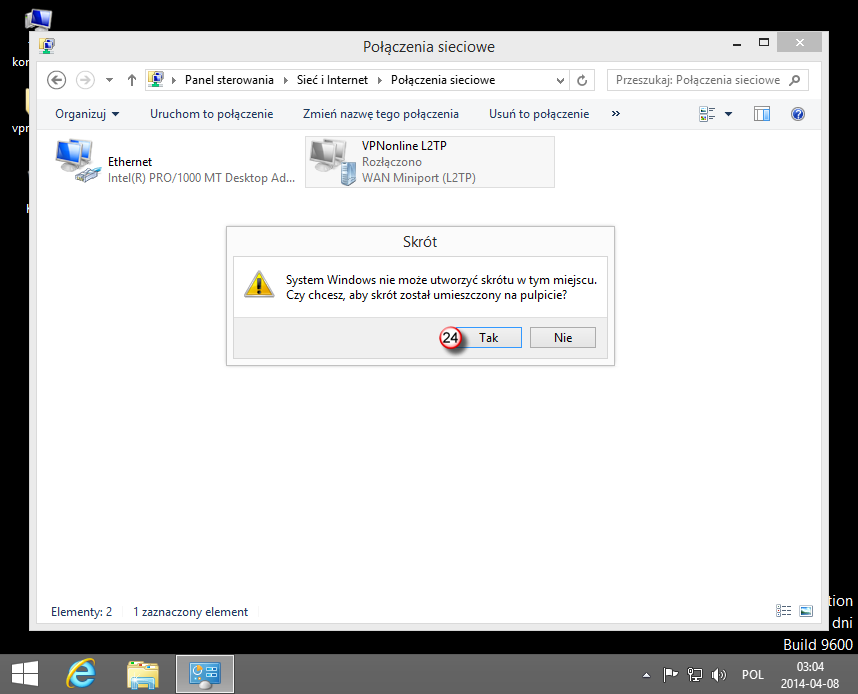
Na pytanie: "Czy chcesz, aby skrót został umieszczony na pulpicie?" wybierz: "Tak" (24)
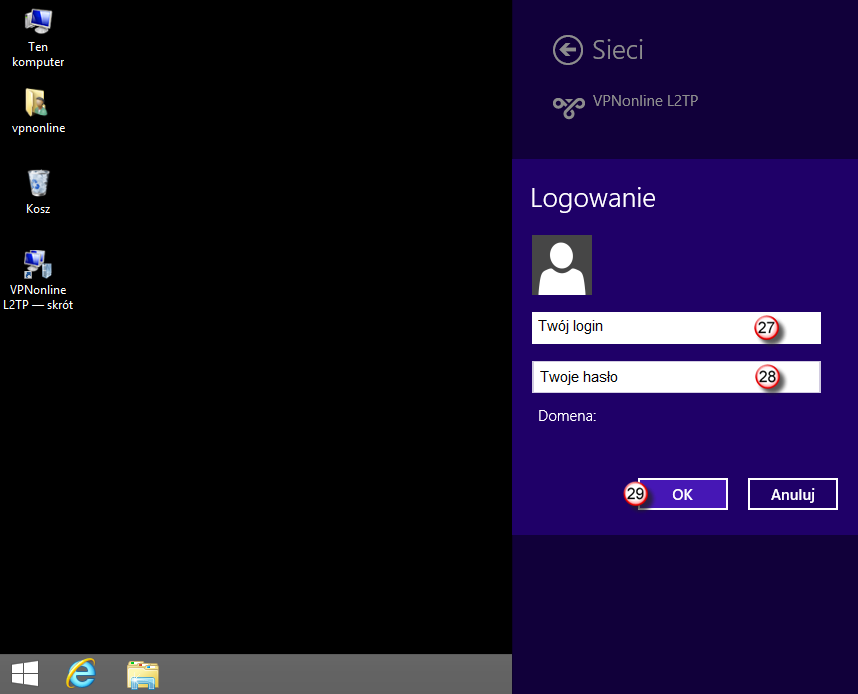
Aby uruchomić połączenie VPN, kliknij skrót na pulpicie "VPNonline L2TP -skrót" (25) i następnie "Połącz" (26)

W polu: "Nazwa użytkownika" (27) - wpisz swój login
W polu: "Hasło" (28) - wpisz swoje hasło
Po wprowadzeniu wymaganych danych, kliknij "OK" (29)
Po poprawnym zestawieniu połączenia VPN, status połączenia zmieni się na "Połączono"

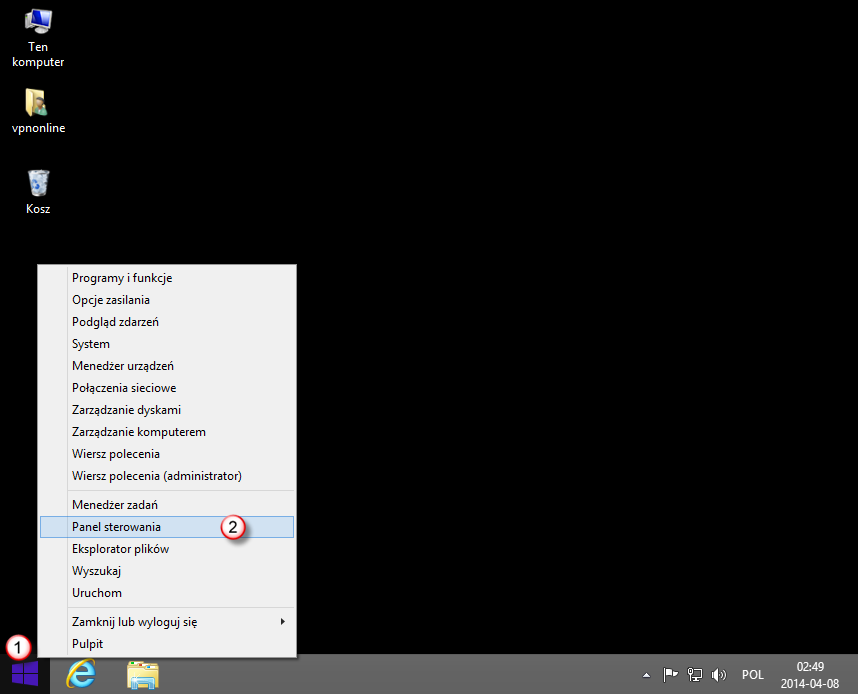
W pierwszym kroku kliknij prawym przyciskiem myszki na przycisk "START" (1) i następnie przejdź do "Panelu Sterowania" (2)

W Panelu Sterowania wybierz "Wyświetl stan sieci i zadania" (3)

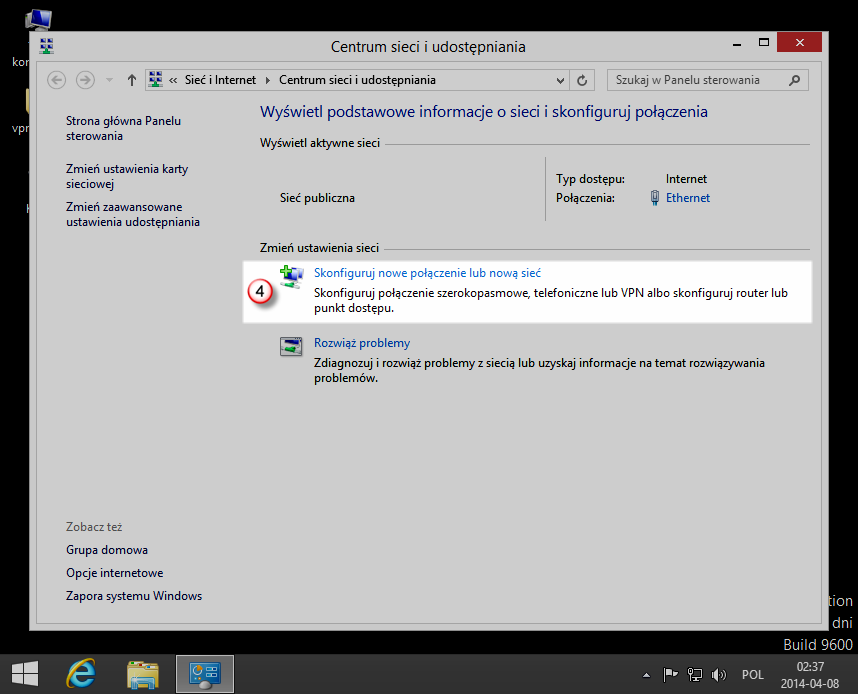
Następnie wybierz "Skonfiguruj nowe połączenie lub nowa sieć" (4)

Wybierz, "Połącz z miejscem pracy" (5) i kliknij "Dalej" (6)
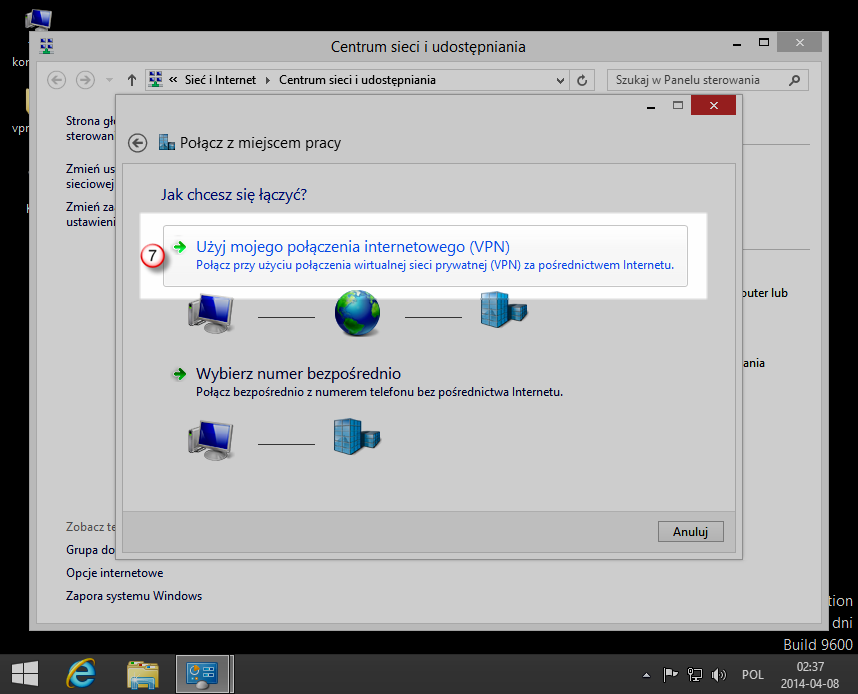
Wybierz, "Użyj mojego połączenia internetowego (VPN)" (7)
W polu: "Adres internetowy" (8) - wpisz nazwę jednego z serwerów VPNonline
W polu: "Nazwa miejsca docelowego" (9) - wpisz nazwę połączenia np. VPNonline PPTP
Po wprowadzeniu wymaganych danych, kliknij "Utwórz" (10)
Listę dostępnych serwerów VPN znajdziesz w panelu klienta: https://portal.vpnonline.pl

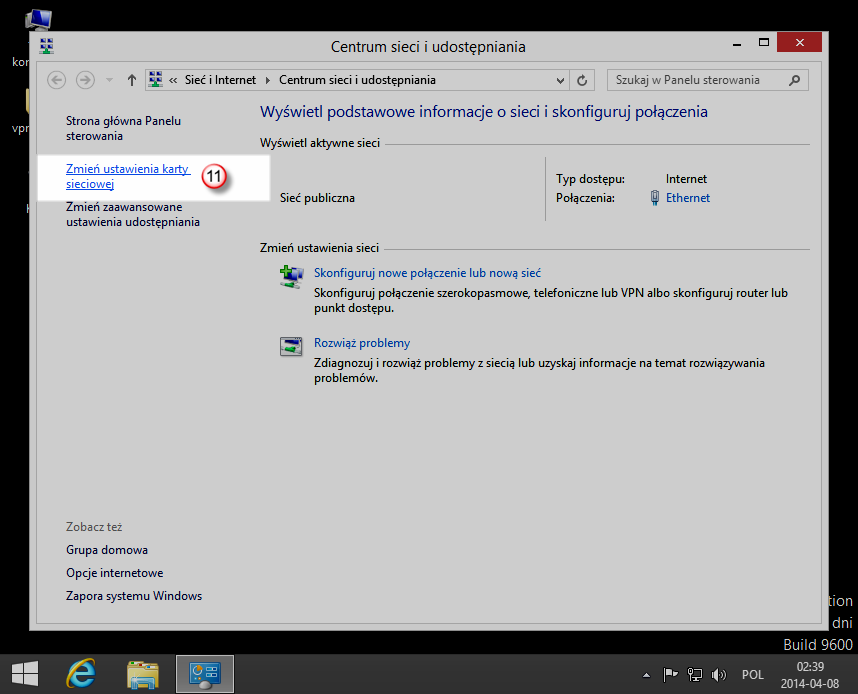
Wróć do okna "Centrum sieci i udostępniania" i wybierz "Zmień ustawienia karty sieciowej" (11)
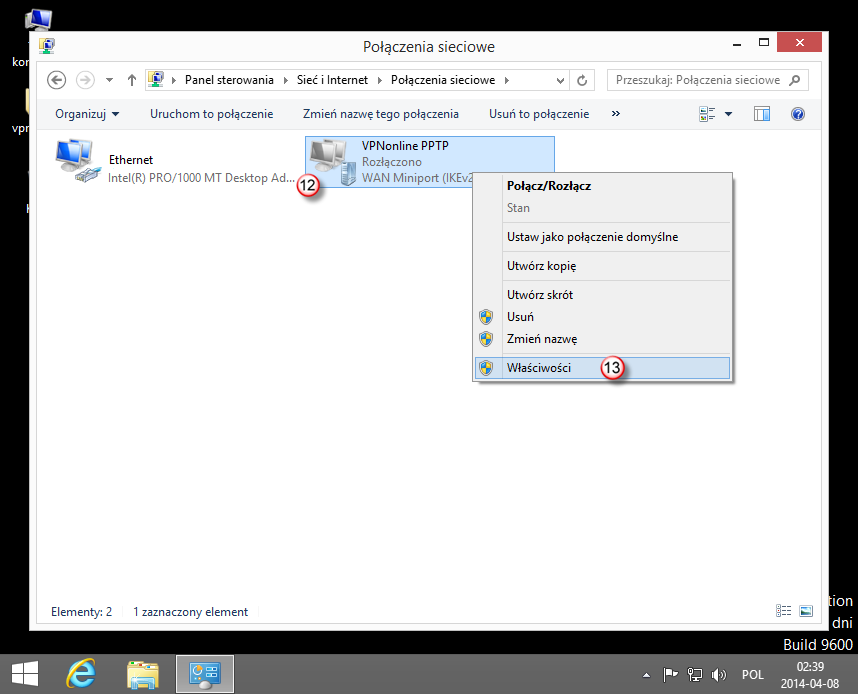
Zaznacz nowo utworzone połączenie "VPNonline PPTP" (12) i kliknij na nim prawym przyciskiem myszy.
Z rozwijanego menu wybierz :"Właściwości" (13)
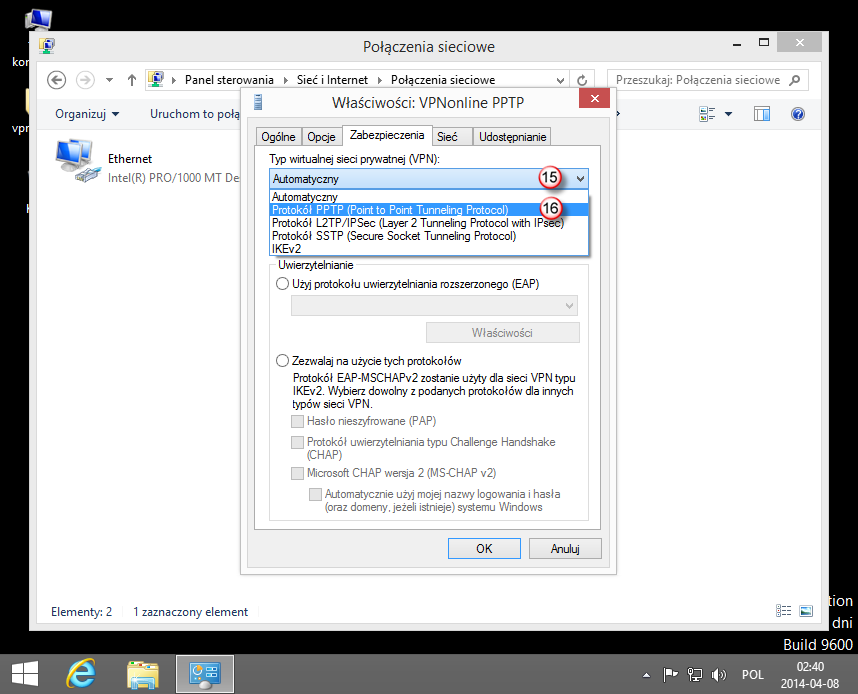
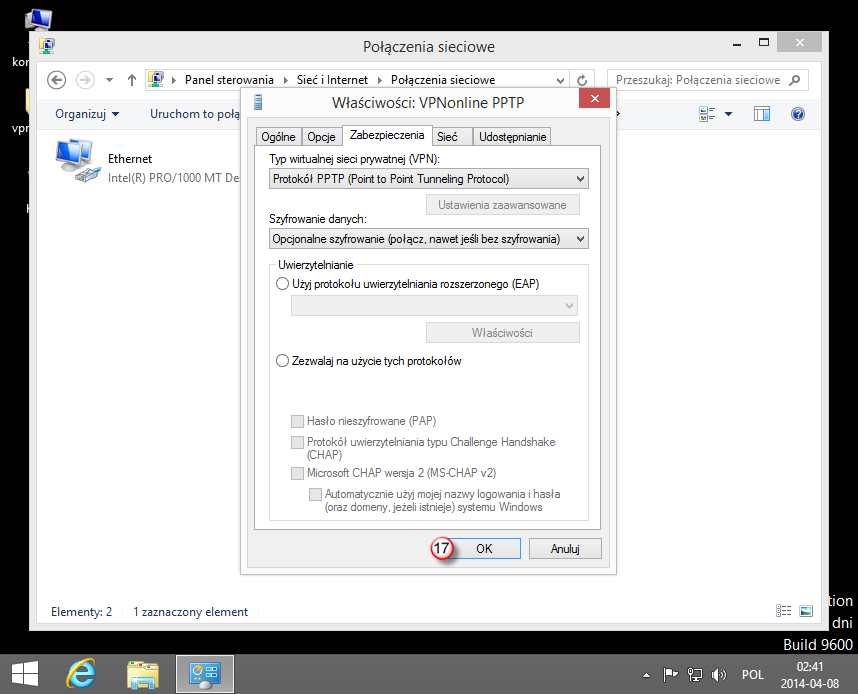
W oknie "Właściwości: VPNonline PPTP" kliknij zakładkę "Zabezpieczenia" (14)

Z rozwijanej listy "Typ wirtualnej sieci prywatnej (VPN)" (15) wybierz "Protokół PPTP ( Point to Point Tunneling Protocol)" (16)
Po wybraniu protokołu "PPTP" kliknij "OK" (17)
Zaznacz ponownie połączenie "VPNonline PPTP" (18) i kliknij na nim prawym przyciskiem myszki.
Z rozwijanego menu wybierz "Utwórz skrót" (19)
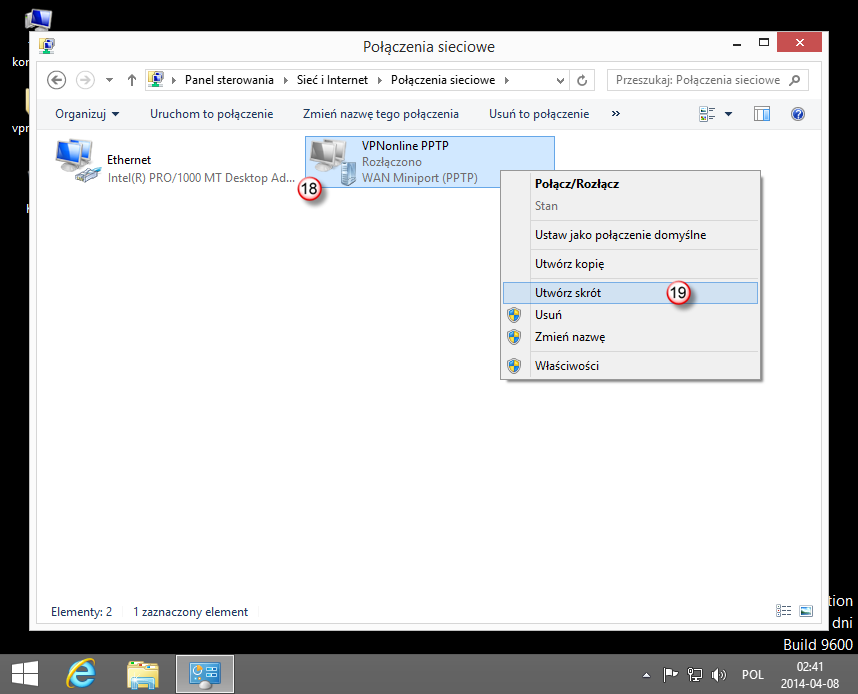
Na pytanie: "Czy chcesz, aby skrót został umieszczony na pulpicie?" wybierz: "Tak" (20)

Aby uruchomić połączenie VPN, kliknij skrót na pulpicie "VPNonline PPTP -skrót" (21) i następnie "Połącz" (22)

W polu: "Nazwa użytkownika" (23) - wpisz swój login
W polu: "Hasło" (24) - wpisz swoje hasło
Po wprowadzeniu wymaganych danych, kliknij "OK" (25)

Po poprawnym zestawieniu połączenia VPN, status połączenia zmieni się na "Połączono"

W pierwszym kroku kliknij prawym przyciskiem myszki na przycisk "START" (1) i następnie przejdź do "Panelu Sterowania" (2)
W Panelu Sterowania wybierz "Wyświetl stan sieci i zadania" (3)

Następnie wybierz "Skonfiguruj nowe połączenie lub nowa sieć" (4)
Wybierz, "Połącz z miejscem pracy" (5) i kliknij "Dalej" (6)

Wybierz, "Użyj mojego połączenia internetowego (VPN)" (7)

W polu: "Adres internetowy" (8) - wpisz nazwę jednego z serwerów VPNonline
W polu: "Nazwa miejsca docelowego" (9) - wpisz nazwę połączenia np. VPNonline SSTP
Po wprowadzeniu wymaganych danych, kliknij "Utwórz" (10)
Listę dostępnych serwerów VPN znajdziesz w panelu klienta: https://portal.vpnonline.pl

Wróć do okna "Centrum sieci i udostępniania" i wybierz "Zmień ustawienia karty sieciowej" (11)

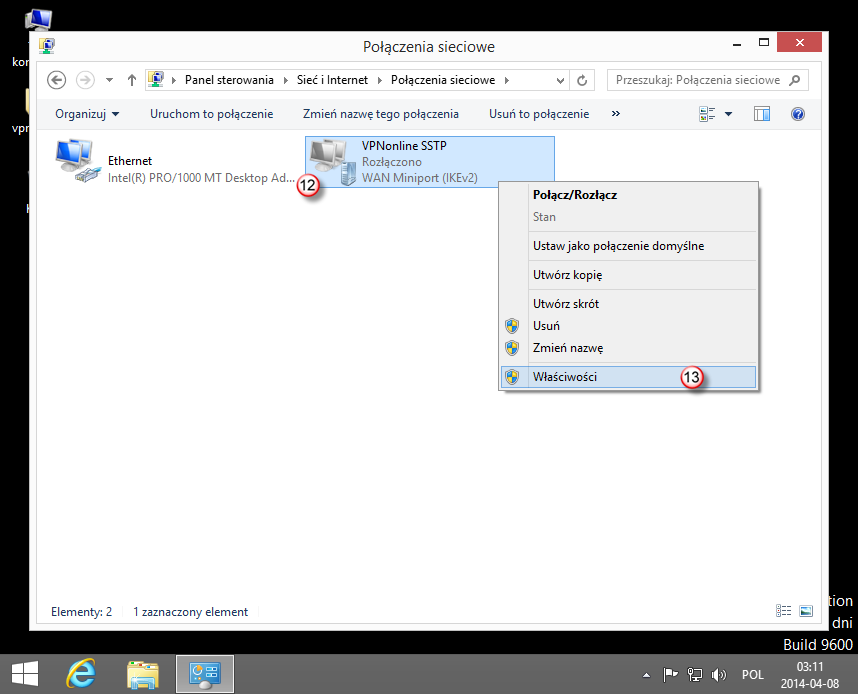
Zaznacz nowo utworzone połączenie "VPNonline SSTP" (12) i kliknij na nim prawym przyciskiem myszy.
Z rozwijanego menu wybierz :"Właściwości" (13)
W oknie "Właściwości: VPNonline SSTP" kliknij zakładkę "Zabezpieczenia" (14)

Z rozwijanej listy "Typ wirtualnej sieci prywatnej (VPN)" (15) wybierz "Protokół SSTP ( Secure Socket Tunneling Protocol)" (16)
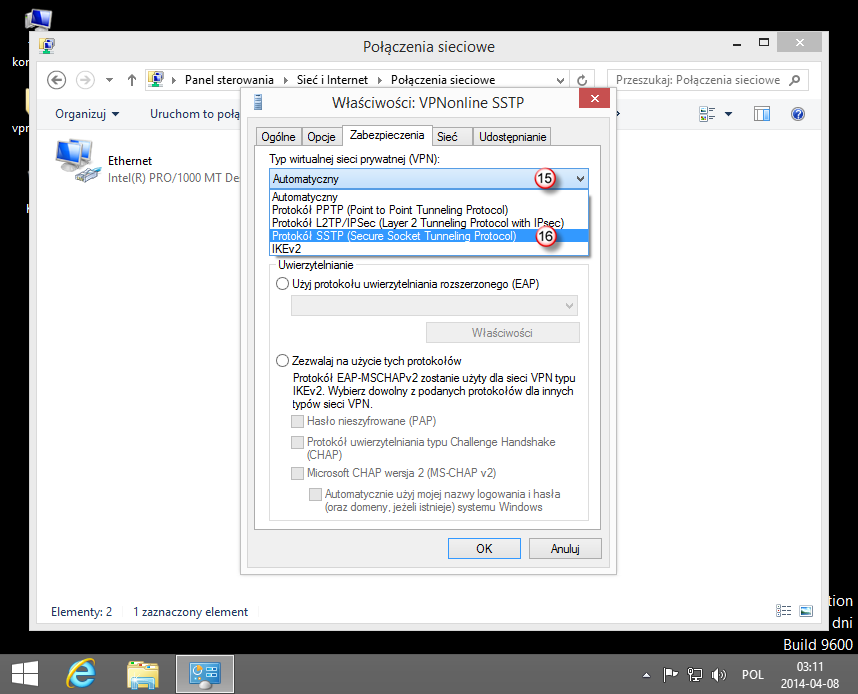
Po wybraniu protokołu "SSTP" kliknij "OK" (17)

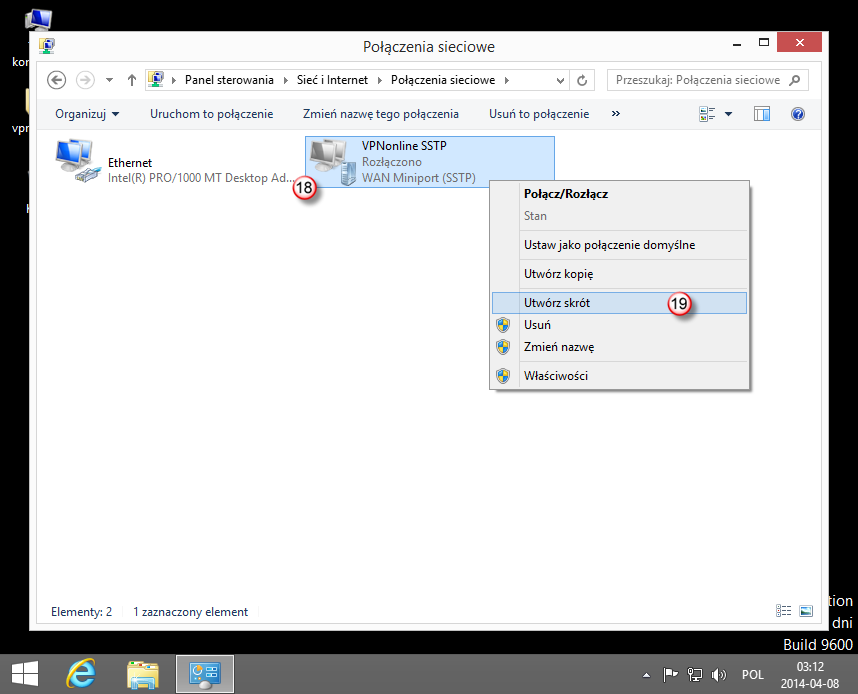
Zaznacz ponownie połączenie "VPNonline SSTP" (18) i kliknij na nim prawym przyciskiem myszki.
Z rozwijanego menu wybierz "Utwórz skrót" (19)
Na pytanie: "Czy chcesz, aby skrót został umieszczony na pulpicie?" wybierz: "Tak" (20)

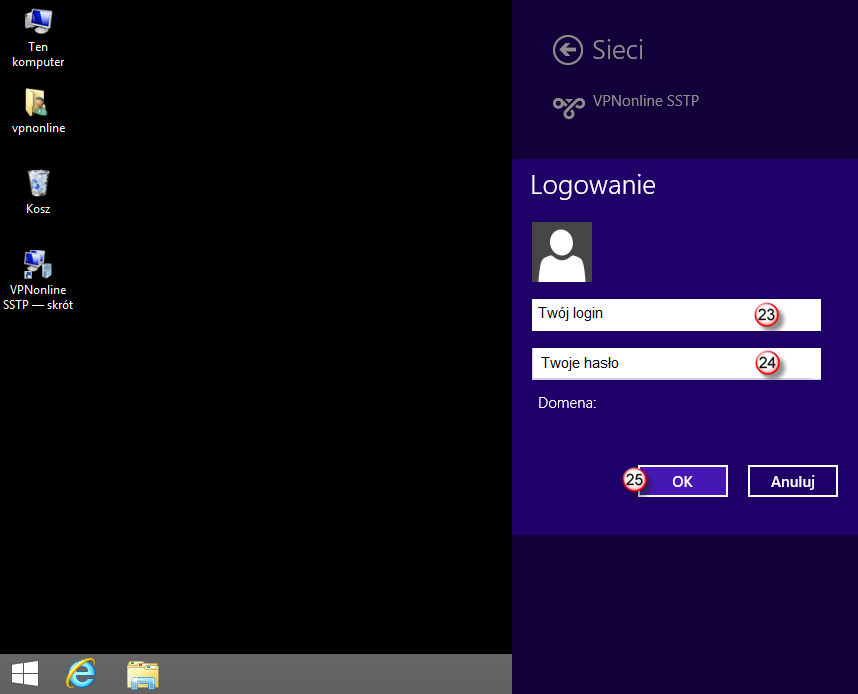
Aby uruchomić połączenie VPN, kliknij skrót na pulpicie "VPNonline SSTP -skrót" (21) i następnie "Połącz" (22)

W polu: "Nazwa użytkownika" (23) - wpisz swój login
W polu: "Hasło" (24) - wpisz swoje hasło
Po wprowadzeniu wymaganych danych, kliknij "OK" (25)
Po poprawnym zestawieniu połączenia VPN, status połączenia zmieni się na "Połączono"

Pobierz aplikację OpenVPN Client
Aplikacja rozprowadzana jest jako Open Source GNU wiec możemy ją instalować i używać bez żadnych ograniczeń.
1. INSTALACJA APLIKACJI OpenVPN
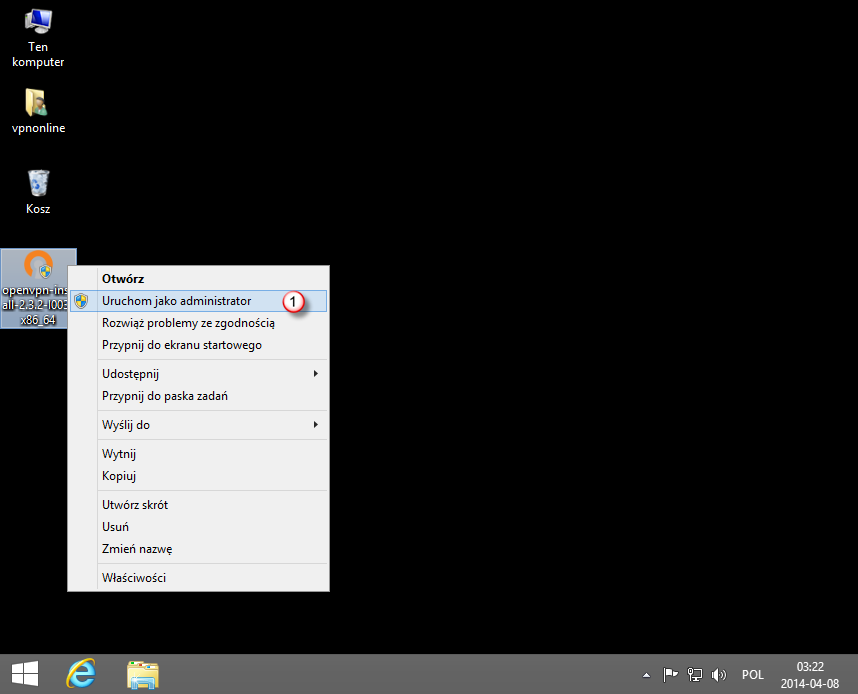
Po pobraniu aplikacji, klikamy na nią prawym przyciskiem myszy i z rozwijanego menu wybieramy "Uruchom jako administrator" (1)
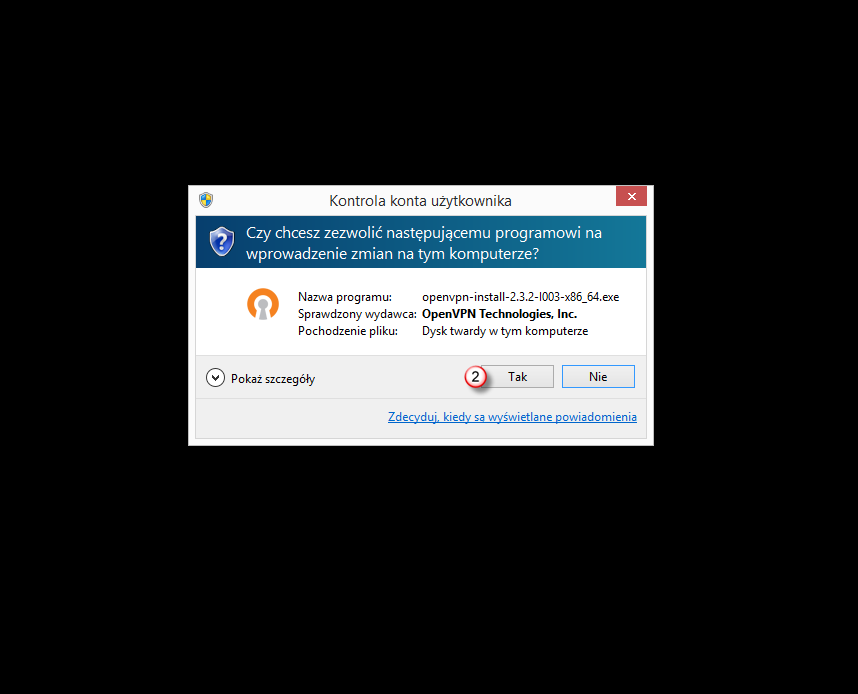
Jeżeli mamy włączoną "Kontrolę konta Użytkownika - UAC" klikamy na "Tak (2) zezwalając na zmiany
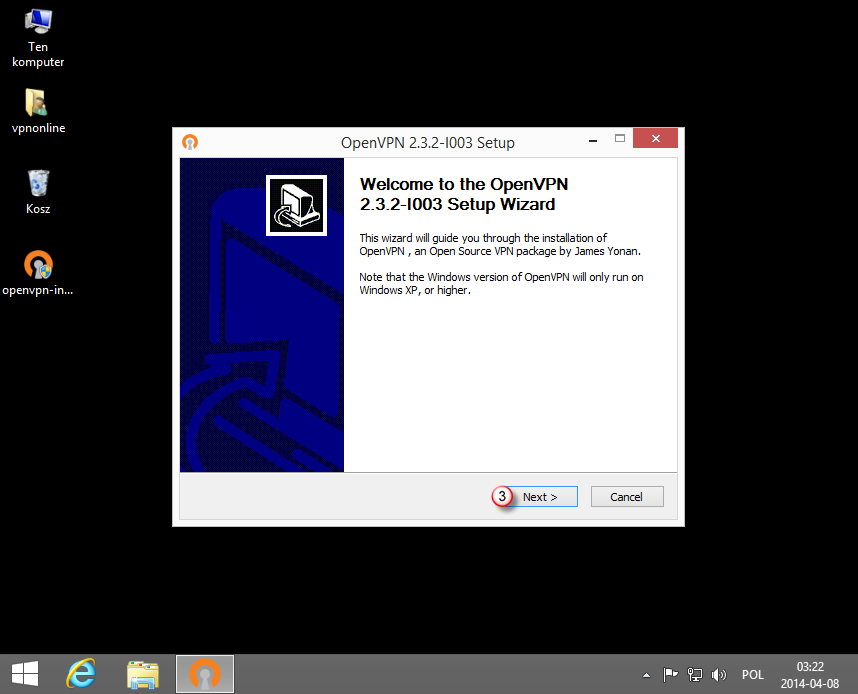
Ekran powitalny aplikacji, klikamy "Next" (3)
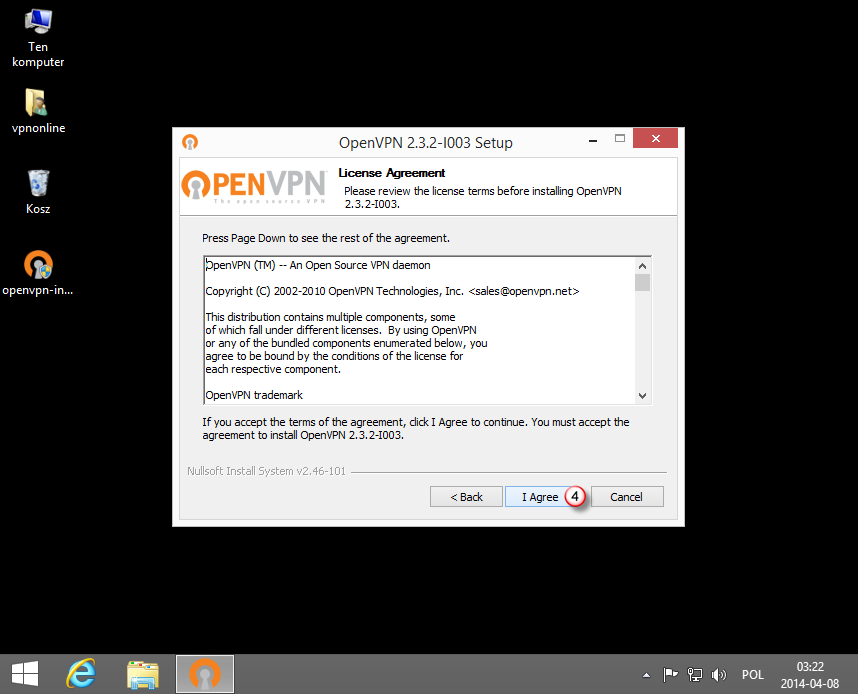
Akceptujemy warunki licencji, klikamy "I Agree" (4)
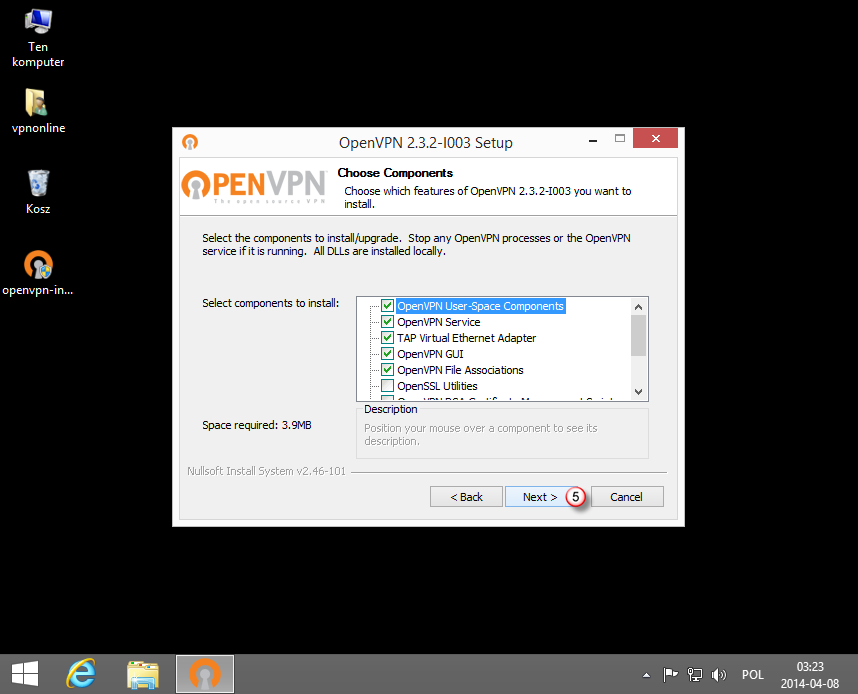
Wybór komponentów, domyślnie zostawiamy już zaznaczone i klikamy "Next" (5)
Potwierdzenie ścieżki gdzie program zostanie zainstalowany.
Domyślna ścieżka instalacji to C:Program FilesOpenVPN lub C:Program Files(x86)OpenVPN klikamy "Install" (6)

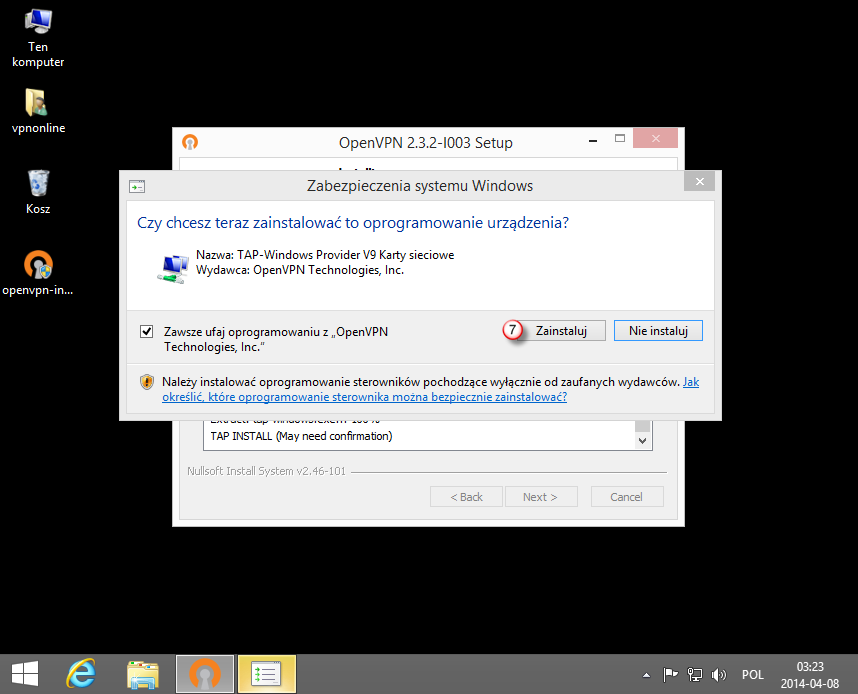
Aby OpenVPN mógł poprawnie działać należy zgodzić się na instalację dodatkowego interfejsu TAP-Win32 Adapter V9
Klikamy: "Zainstaluj" (7)
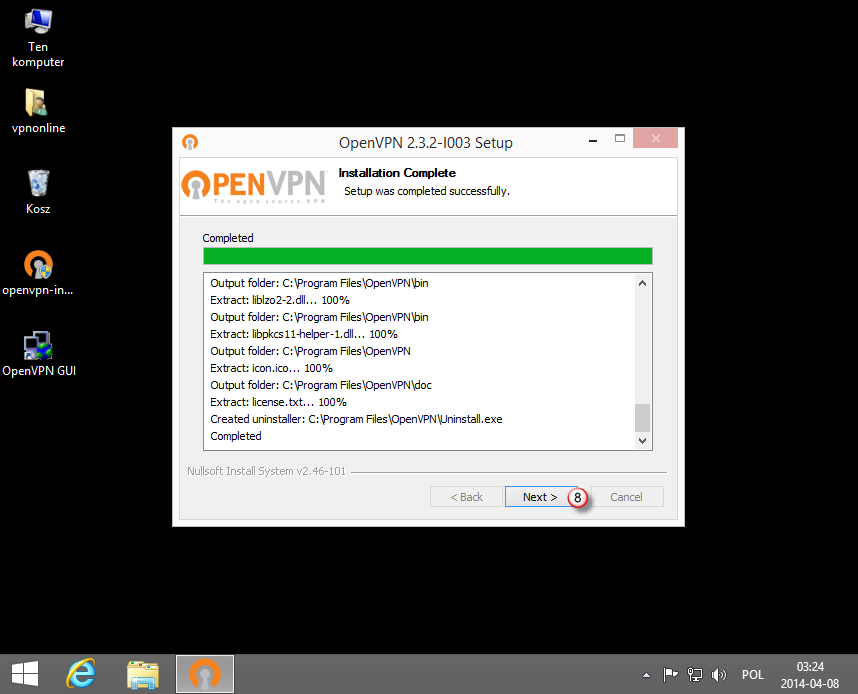
Po zakończeniu instalacji klikamy "Next" (8)
Odznaczamy "Show Readme" (9) i następnie wybieramy "Finish" (10)

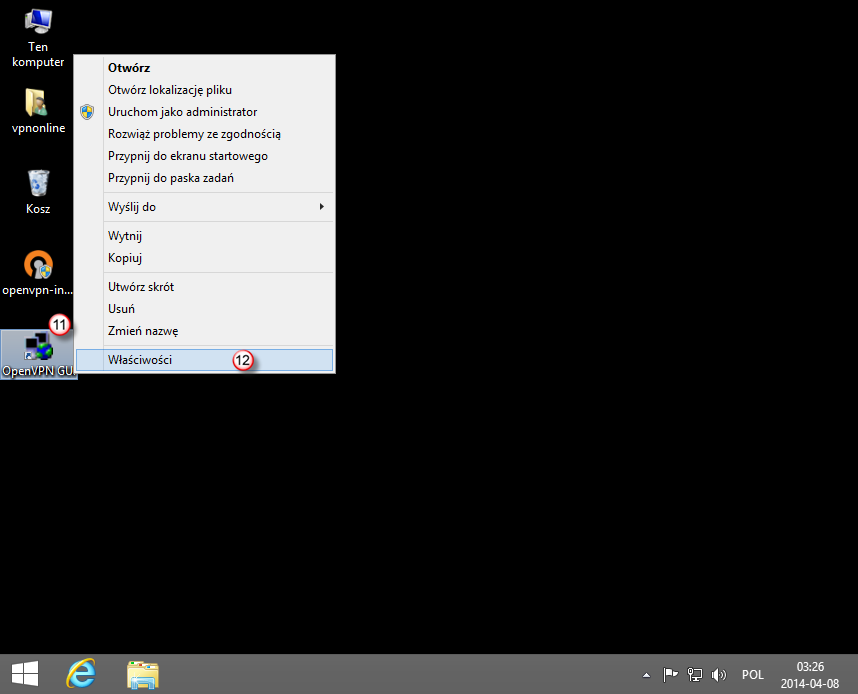
Na pulpicie został utworzony nowy skrót "OpenVPN GUI" (11), klikamy na ikonce prawym przyciskiem myszy i
z rozwijanego menu wybieramy "Właściwości" (12).
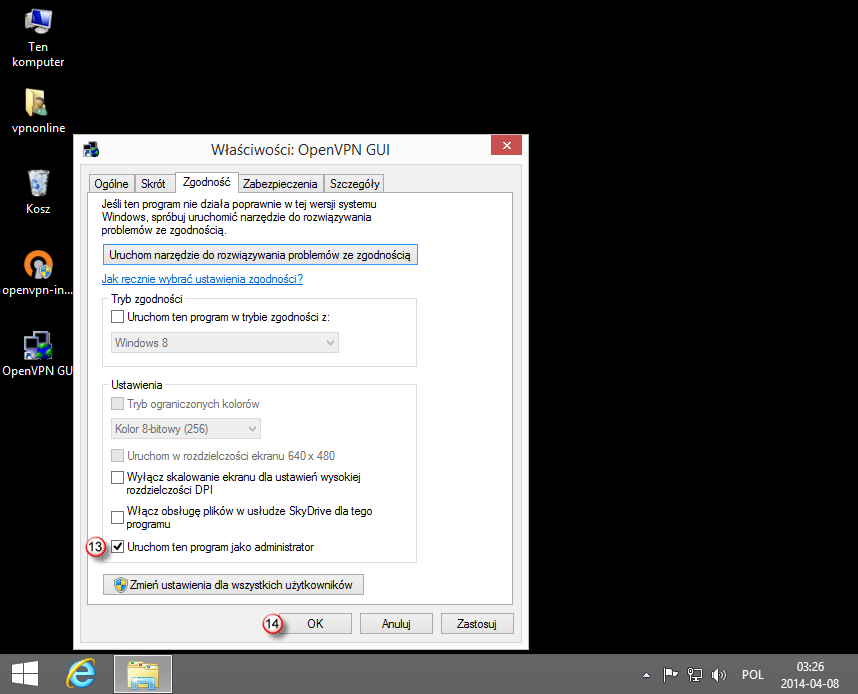
Przechodzimy do zakładki "Zgodność".
Aby OpenVPN GUi uruchamiał się zawsze z uprawnieniami administratora, we właściwościach aplikacji
zaznaczamy "Uruchom ten program jako administrator" (13)
Klikamy "OK" (14)
2. KONFIGURACJA APLIKACJI OpenVPN klient
Przed uruchomieniem aplikacji OpenVPN musimy jeszcze pobrać pliki konfiguracyjne z działu: Downloads
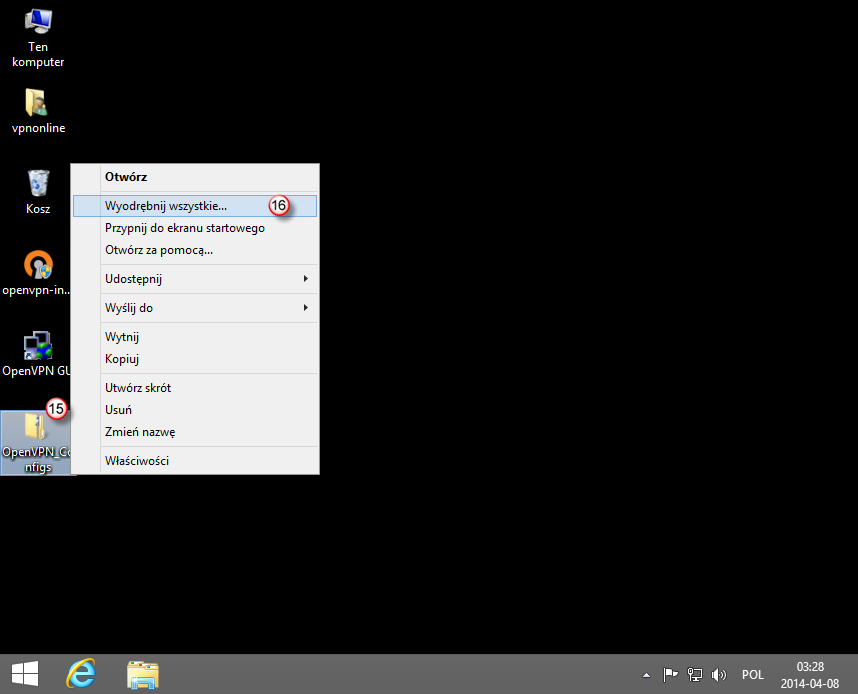
Po pobraniu paczki konfiguracyjnej "OpenVPN_Configs" należy wypakować (wyodrębnić pliki) do katalogu na pulpicie.
Zaznaczamy i klikamy prawym przyciskiem myszki na "OpenVPN_Configs" (15).
Z rozwijanego menu wybieramy "Wyodrębnij wszystkie..." (16)
W kolejnym oknie, klikamy "Wyodrębnij" (17)

Na pulpicie znajdziemy nowy katalog z plikami konfiguracyjnymi "OpenVPN_Configs"
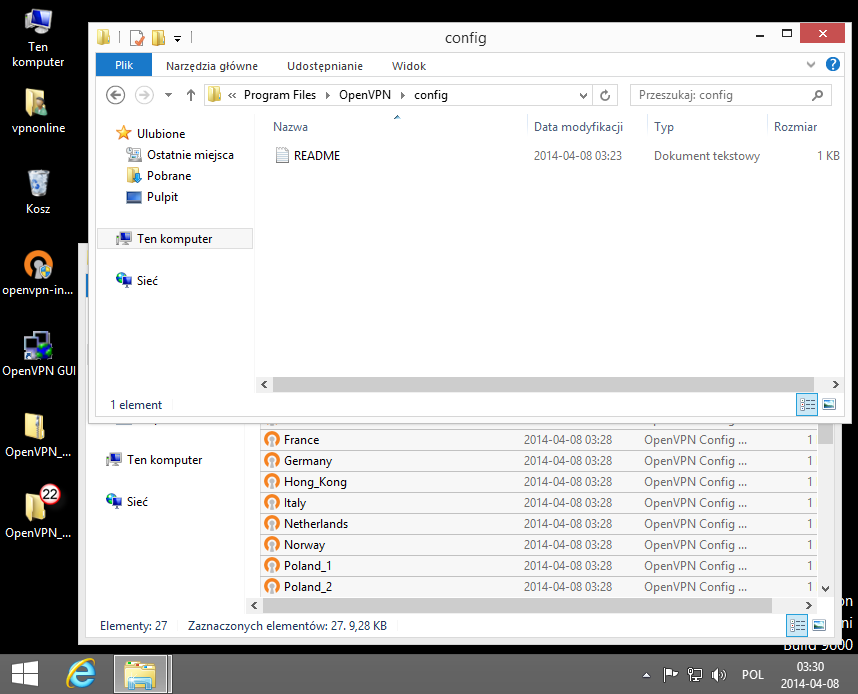
Następnie klikamy w:
"Mój komputer" (18) -> "Dysk C:" -> "Program Files" (19) lub "Program Files (x86)" -> "OpenVPN" (20) -> "config" (21)

Mamy otwarty katalog "config".
Następnie w drugim oknie, otwieramy katalog "OpenVPN_Configs" (22)
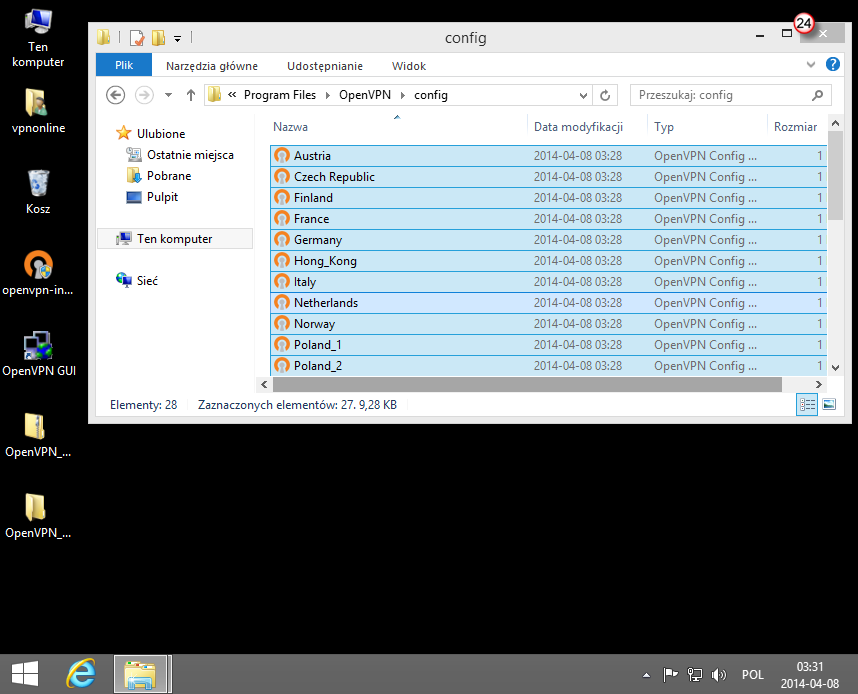
Zaznaczamy wszystkie pliki konfiguracyjne w katalogu "OpenVPN_Config" i przeciągamy do katalogu "config"
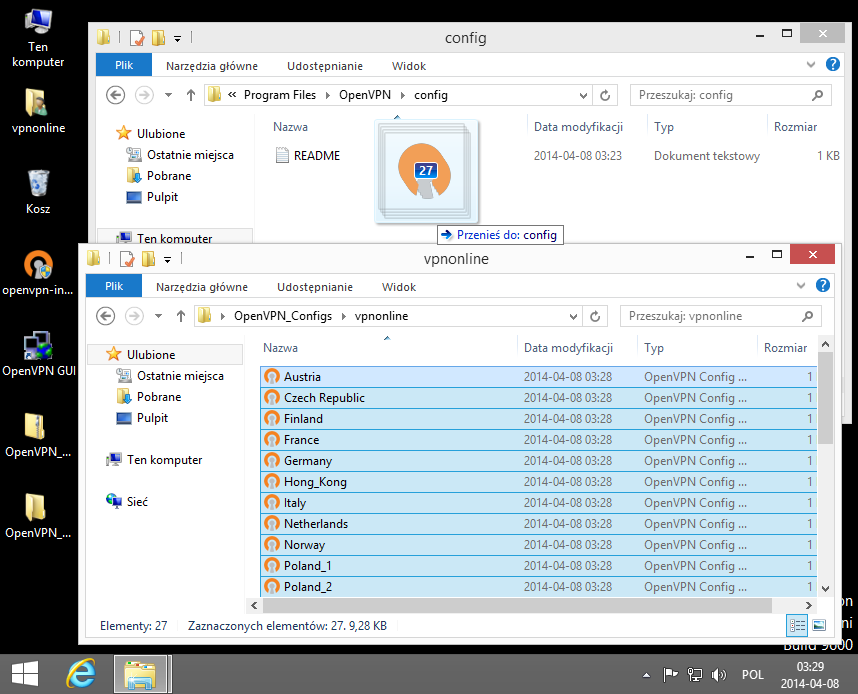
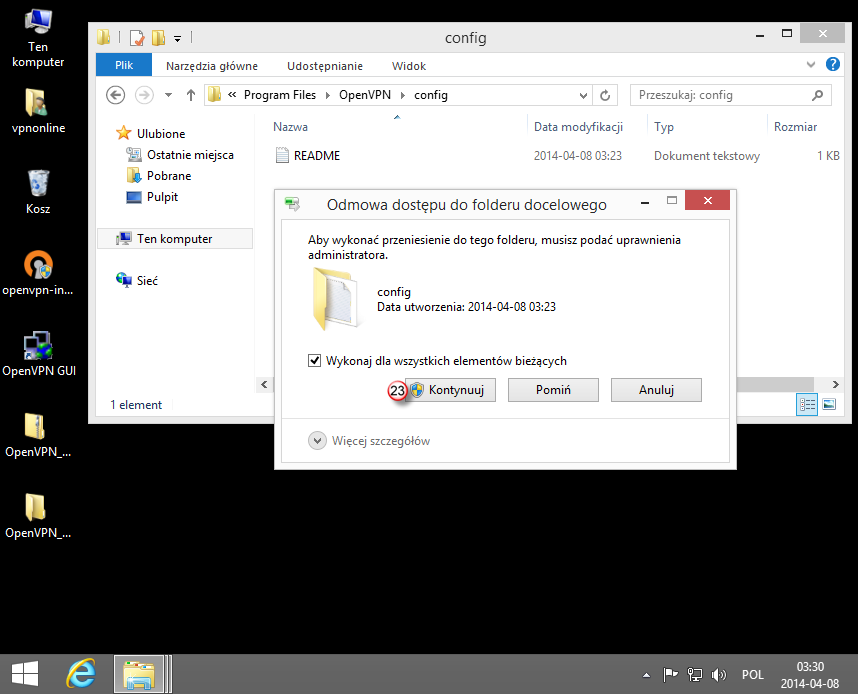
Podczas przenoszenia plików konfiguracyjnych możemy otrzymać ostrzeżenie o braku uprawnień administracyjnych
Klikamy "Kontynuuj" (23)
Po poprawnym przeniesieniu plików konfiguracyjnych zamykamy okno katalogu "config" (24)
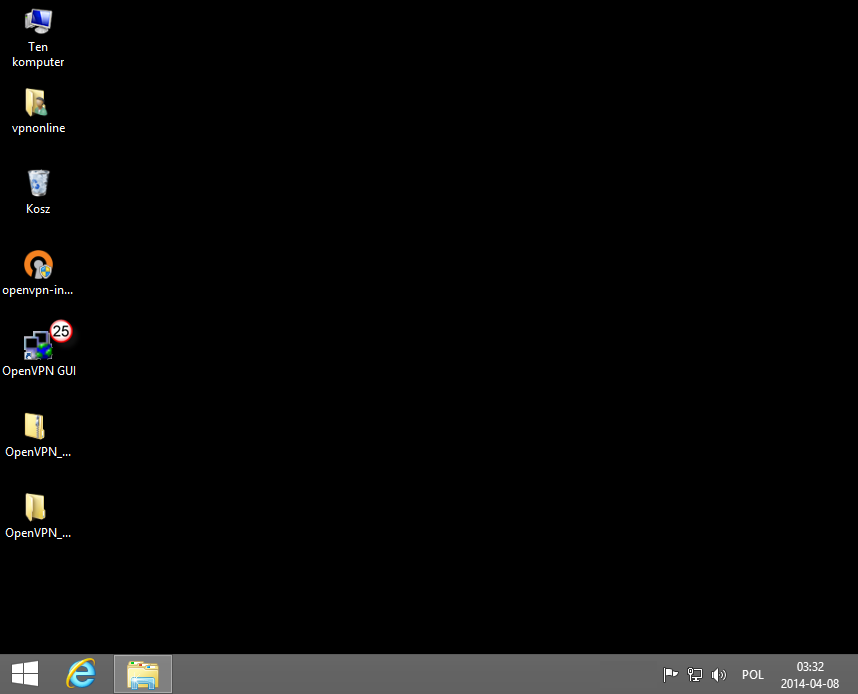
Klienta OpenVPN uruchamiamy poprzez skrót na pulpicie "OpenVPN GUI" (25)
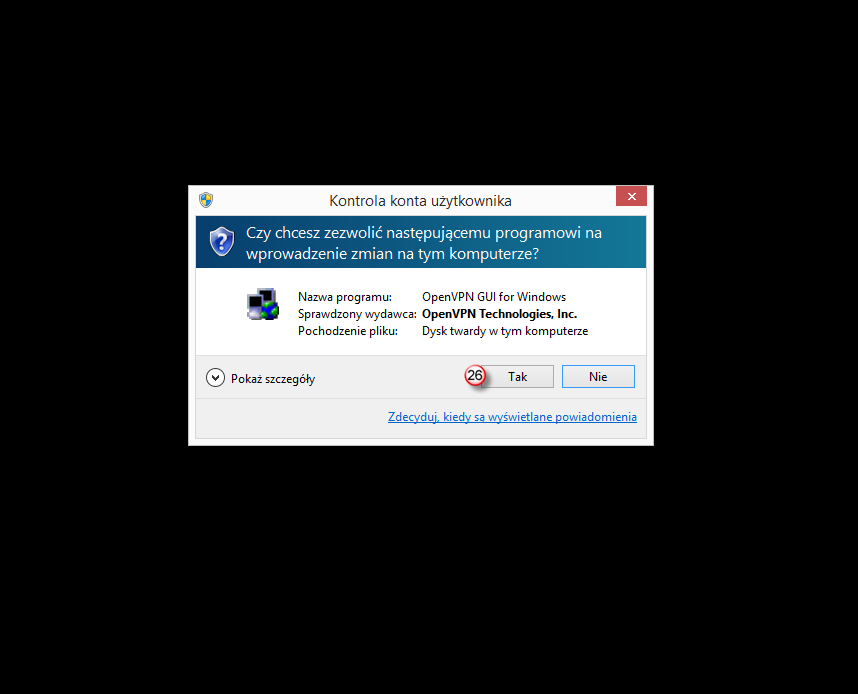
Jeżeli mamy włączoną "Kontrolę konta użytkownika - UAC" klikamy na "Tak (26) zezwalając na zmiany
OpenVPN klient został uruchomiony i w prawym dolnym rogu zobaczymy nowa ikonkę (27)
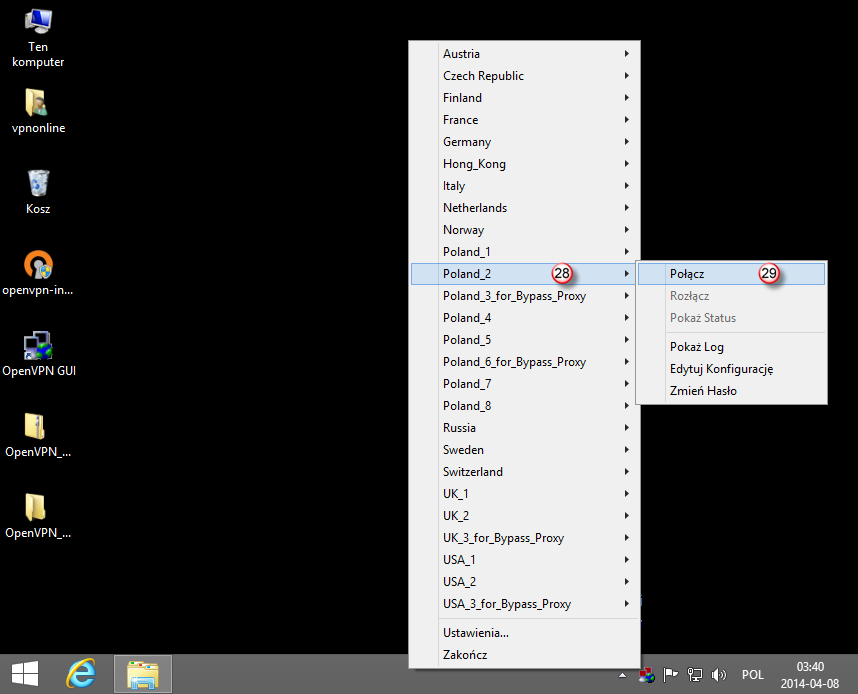
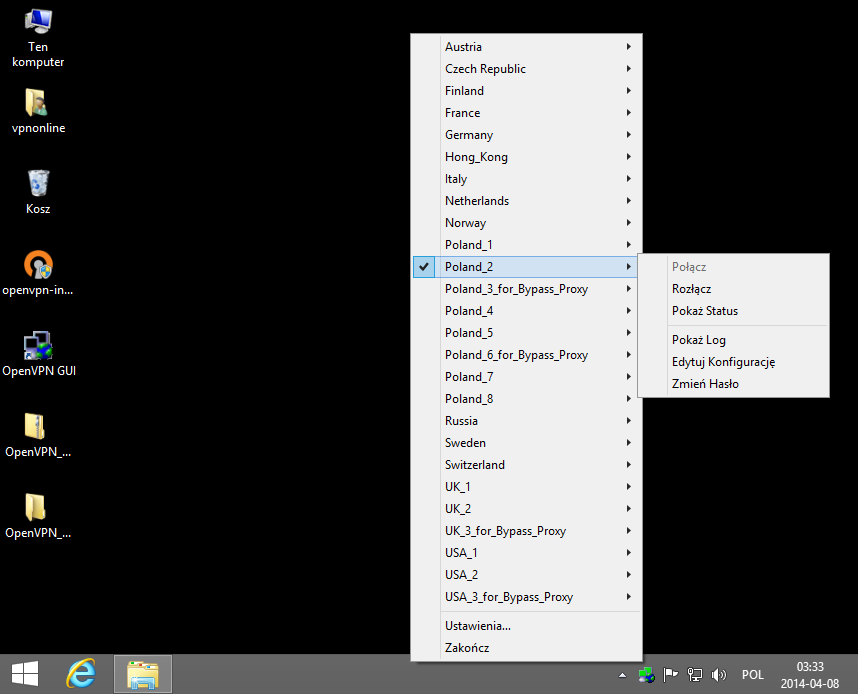
Klikamy na nią prawym przyciskiem myszki i z rozwijanej listy wybieramy interesujący nas serwer VPN (28)
Następnie przycisk "Połącz" (29)
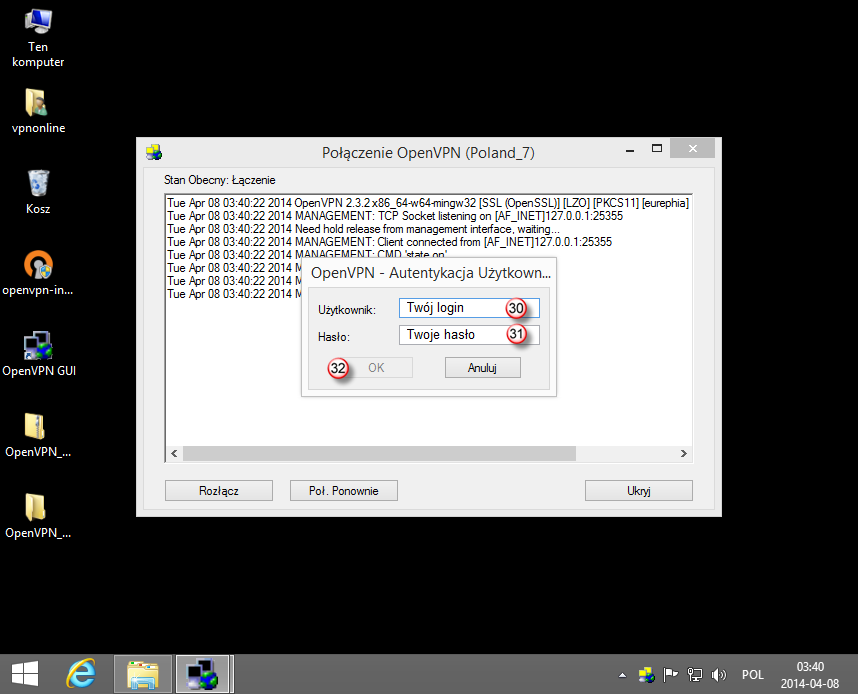
W trakcie połączenia do serwera VPN, zostaniemy poproszeni o wpisanie swojego loginu (30) i hasła (31)
Po wpisaniu wymaganych danych klikamy "OK" (32)
Login i hasło są takie same jak do portalu klienta
Po poprawnym zestawieniu połączenia VPN, OpenVPN klient zmieni kolor na zielony (33)

Aby rozłaczyć połączenie VPN, klikamy prawym przyciskiem myszy na ikonkę OpenVPN klienta i z rozwijanej listy wybieramy serwer VPN, a następnie "Rozłacz"

Działamy od 2013 roku
IWACOM SP. Z O.O.
Rewolucji 1905 r. nr 4
90-273 Łódź
Polska